Table of Contents
ToggleIf you own a KitchenAid stand mixer, you’ve got one of the most reliable workhorses in the kitchen. But like any piece of equipment, understanding how it’s put together makes maintenance, troubleshooting, and repair work infinitely easier. A KitchenAid mixer parts diagram isn’t just for technicians, it’s a homeowner’s roadmap to keeping this investment running smoothly for decades. Whether you’re replacing a worn-out attachment, diagnosing a strange noise, or simply curious about what makes your mixer tick, knowing your mixer’s anatomy gets you there faster. This guide breaks down the key components, explains what each part does, and shows you how to use a parts diagram to solve common problems.
Key Takeaways
- A KitchenAid mixer parts diagram is essential for diagnosing problems, performing maintenance, and replacing worn components without professional help.
- The mixing head houses a powerful induction motor and transmission gears that enable planetary action, where the bowl and mixing shaft rotate in opposite directions for even mixing.
- Each mixing attachment—the flat paddle, wire whip, and dough hook—serves a specific purpose, and using the correct one prevents mixer strain and delivers better results.
- Commonly replaced parts like mixing paddles, gaskets, and seals are affordable ($15–$35) and can be swapped by homeowners, but internal components like transmission gears require more expertise.
- Regular maintenance like cleaning after use, using proper attachments, and consulting your parts diagram at the first sign of unusual noise can extend your mixer’s lifespan for decades.
- Always locate your mixer’s model number before referencing a parts diagram, as KitchenAid produced hundreds of variants with different internal geometry and attachment methods.
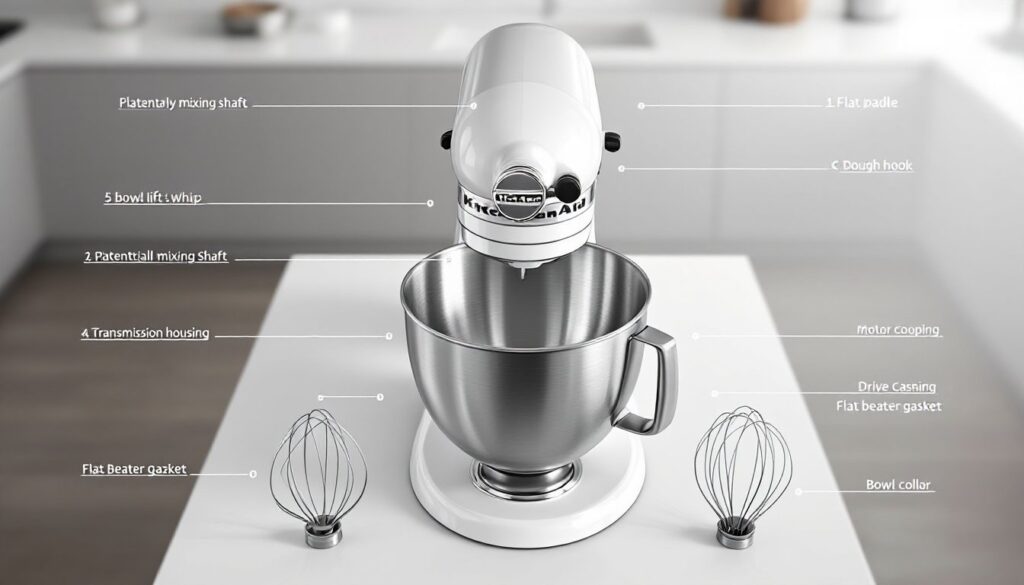
Understanding Your KitchenAid Mixer’s Main Components
The Mixing Head and Motor Housing
At the heart of every KitchenAid stand mixer sits a powerful induction motor, typically rated between 250 and 575 watts depending on the model. This motor drives a planetary action, a mechanism where the mixing shaft rotates in one direction while the bowl rotates in the opposite direction, ensuring the entire bowl’s contents get mixed evenly. The motor housing is the sturdy metal casting that protects all these internal gears and electrical components.
The head assembly tilts up to allow bowl access, held in place by a pivot screw on either side. Inside the head lives the transmission, a series of gears that step down the motor’s speed to the optimal mixing speed. This gear system is why your mixer can handle stiff doughs: high torque at low RPM is the trade-off. If your mixer sounds like it’s grinding or won’t turn the bowl, the transmission gears may need inspection.
The power switch and speed control dial mount on the front of the head. The dial typically offers 10 speeds, from a slow fold (speed 1) to a rapid whip (speed 10). Above the speed dial, you’ll find the bowl-lift mechanism, a threaded rod that raises and lowers the bowl platform. This is purely mechanical and doesn’t require electronics: if it gets stiff, a little food-grade silicone lubricant on the threads helps.
The Bowl and Attachment System
The mixing bowl itself is stainless steel, available in 5-quart, 6-quart, and 8-quart capacities on different models. It’s the rotating platform that holds your ingredients. The bowl sits on a stainless steel collar and locked in place by the bowl locking ring, a twist-on collar that prevents the bowl from spinning free during mixing.
Below the head, you’ll notice the planetary mixing shaft, which extends down into the bowl. This shaft is what holds your mixing attachments, the flat mixing paddle, the coiled wire whip, and the C-shaped dough hook. Each attachment slides onto the shaft and is held by a pin or clip: if you can’t remove an attachment, you may need to consult your mixer’s parts diagram to locate this pin.
The splash guard is a simple but important piece: a ring that sits above the bowl and reduces flour clouds and splattering. It’s removable for cleaning, though not all models include one. The pouring shield, a half-moon guard, is optional on some models and lets you add ingredients while the mixer runs without everything flying out.
Essential Mixing Attachments Explained
Your KitchenAid mixer comes with three primary attachments, each designed for a specific task. Understanding what each one does, and when to swap them, is crucial for getting the best results without overworking your mixer.
The flat mixing paddle (sometimes called the flat beater) is the workhorse. It’s shaped like a rectangular blade and is best for mixing butter, sugar, and wet ingredients, as well as blending cake batters and cookie doughs. It scrapes the bowl sides as it rotates, reaching the corners where a whip or hook might miss. Use this attachment for most everyday baking and cooking tasks.
The coiled wire whip (or balloon whip) is aerated and open. It incorporates air into mixtures, making it perfect for whipping cream, beating egg whites, and mixing lightweight batters. Because it’s open-bottomed, it doesn’t scrape the bowl as thoroughly, so it’s less ideal for dense doughs. If you’re making meringue or chantilly cream, the wire whip is your friend.
The C-shaped dough hook (sometimes called the spiral hook on newer models) has the roughest job: mixing and kneading stiff bread doughs and pasta doughs. It’s designed to handle the high torque required for gluten development. If you notice excessive resistance or the motor laboring when using the dough hook on bread dough, your mixer is working as intended, that’s normal. Avoid using the dough hook for batters or soft doughs: the mixer will strain unnecessarily.
When swapping attachments, always unplug the mixer and let the motor cool briefly if you’ve been mixing at high speed. Some mixers have a safety switch that cuts power when the head is tilted up, but don’t rely on that alone. Keep a step-by-step guide handy if you’re unfamiliar with your specific model’s attachment-release mechanism, it can vary slightly between product lines and years.
Replacement Parts and Maintenance Essentials
Over time, KitchenAid mixer parts wear out and need replacing. The good news: most replacements are simple enough for a homeowner to handle without professional repair.
Commonly replaced parts include:
• Mixing paddle, wire whip, and dough hook, these take the most abuse and are the cheapest replacements. They typically cost $15–$35 each.
• Flat beater gasket, a rubber or silicone seal where the shaft exits the head. If you see flour leaking into the head, this gasket is likely worn.
• Roller and scraper assembly, a bearing and guide that helps the attachment interact with the bowl. Wear here is rare but causes noise.
• Transmission gears, these are inside the head assembly and require more involved disassembly. Most homeowners shouldn’t attempt this without a parts diagram and patience.
• Motor capacitor, if your mixer won’t start or starts intermittently, the capacitor may have failed. This is an electrical component and should only be replaced if you’re comfortable working with electrical parts.
• Speed controller, if the mixer won’t respond to speed changes, the dial mechanism may need replacement.
To prevent premature wear, clean your mixer after every use. Unplug it, wipe down the exterior with a damp cloth, and hand-wash the bowl and attachments (most aren’t dishwasher-safe). Avoid leaving thick batters sitting in the bowl for long periods: dried dough is harder to remove and can stress the gears. If you notice unusual noises, grinding, or resistance, consult your parts diagram and manual before operating further. Common DIY repair guides are available at Family Handyman, covering attachment replacement and basic troubleshooting for many KitchenAid models.
How to Use Your Parts Diagram for Troubleshooting
A KitchenAid mixer parts diagram is more than a catalog, it’s a diagnostic tool. When something goes wrong, the diagram tells you what parts interact with one another and where to look first.
If your mixer won’t start:
Check the power cord and outlet first. If power isn’t the issue, consult your parts diagram to locate the thermal overload switch, a safety device that cuts power if the motor overheats. If it’s tripped, unplug the mixer and let it cool for 30 minutes. Don’t force the mixer: if it keeps overheating, debris may be jamming the transmission gears.
If you hear grinding or squealing:
Stop immediately and unplug the mixer. The noise usually points to worn gears or missing lubrication in the transmission. Your parts diagram will show the gear positions inside the head. If it’s a squealing sound, the shaft bearing may need lubrication: a tiny amount of food-grade silicone grease applied at the contact points sometimes helps. Grinding noises suggest internal gear damage, which typically requires professional service or a new transmission assembly.
If the bowl won’t turn or attachments slip:
This points to the motor coupling or internal drive gear. Your parts diagram shows how the motor connects to the shaft that turns the bowl. Looseness here means the motor is spinning but not transferring power. This usually requires disassembly.
If your mixer leaks flour or batter from the head:
The drive shaft seal or flat beater gasket is likely worn. Your parts diagram identifies these seals, and they’re relatively inexpensive replacements. You’ll need to tilt up the head and may need to remove the mixing paddle to access them. Resources like Popular Mechanics offer hands-on guides for accessing mixer components on popular models.
Always locate your specific model number (usually on a sticker inside the bowl) before consulting a parts diagram. KitchenAid made hundreds of variants over decades, and while the basics are similar, attachment methods and internal geometry can differ. Your owner’s manual includes a parts diagram, or you can find one on the manufacturer’s website by model number.
Conclusion
Understanding your KitchenAid mixer’s parts diagram transforms you from a casual user into someone who can maintain, troubleshoot, and even repair their equipment. Most maintenance is preventive: keep it clean, don’t overload it, and use the right attachment for the task. When problems arise, the diagram is your guide to what’s where. With this knowledge, your mixer will keep running strong for decades.