Table of Contents
ToggleA kitchen cart island isn’t just a trendy kitchen gadget, it’s a practical solution for homeowners juggling limited counter space and storage. Whether you’re in a small apartment, a galley kitchen, or just need an extra work surface, a kitchen cart island fills the gap where a permanent island would be overkill or impossible to install. These mobile workstations combine functionality with flexibility, letting you move them around as your needs change. Unlike a built-in island that requires construction and commitment, a kitchen cart island gets you started on improving your workflow in a weekend.
Key Takeaways
- A kitchen cart island is a mobile, freestanding solution that adds counter space and storage to any kitchen without requiring permanent construction or renovations.
- Measure your kitchen carefully (width, depth, and height) and ensure at least 12 inches of clearance on each side before purchasing a kitchen cart island to avoid traffic flow issues.
- Prioritize stability and locking casters when selecting a cart, and choose materials like stainless steel, butcher block, or laminate based on your maintenance preferences and kitchen aesthetic.
- Position your cart away from the kitchen work triangle (refrigerator, stove, sink) and keep it at least 2 feet from heat sources and humidity to prevent warping and extend the cart’s lifespan.
- Organize your kitchen cart island by assigning zones (top for frequently used items, middle for spices, bottom for heavy cookware) and maintain 60-70% shelf capacity to ensure balance and ease of movement.
- Regular maintenance—wiping surfaces after use, monthly oiling for butcher block tops, and quarterly caster checks—will keep your cart functional and lasting 10+ years as an indispensable kitchen fixture.
What Is a Kitchen Cart Island and Why You Need One
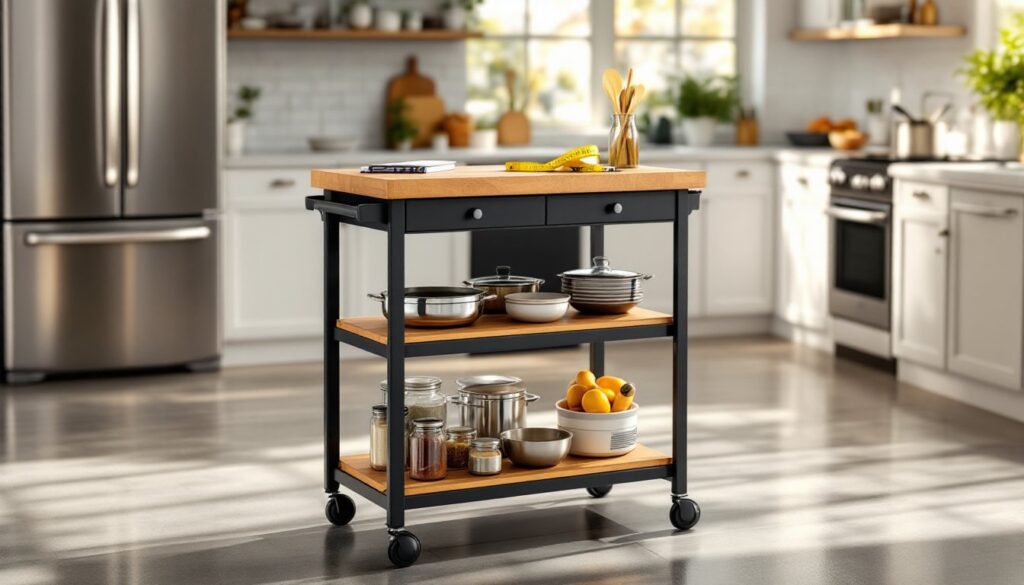
A kitchen cart island is a freestanding, mobile storage and work surface unit designed to expand your kitchen’s functionality. Think of it as a rolling workbench tailored for cooking and food prep. Most come with open shelving, drawers, and a sturdy countertop surface, typically made from wood, stainless steel, or butcher block.
They solve real problems homeowners face. If you’re prepping a Thanksgiving dinner and your counter is buried in ingredients, roll in the cart. If you need extra cutting space while someone else is using the main island, it’s right there. For renters or those who can’t commit to permanent renovations, a kitchen cart island offers restaurant-grade organization without the construction dust and permits.
Beyond prep work, these carts function as beverage stations, display shelves for cookbooks, or temporary storage during renovations. The open shelving means your most-used items stay visible and within arm’s reach. Since they’re mobile, you adjust your kitchen layout seasonally or whenever your workflow changes, no walls to move.
Choosing the Right Size and Style for Your Space
Measuring Your Kitchen Layout
Before you buy or build, measure your kitchen in three directions: width, depth, and height. Kitchen cart islands typically range from 24 to 36 inches wide and 18 to 24 inches deep. If your walkway is 36 inches or narrower between your counters and appliances, a cart wider than 24 inches will feel cramped and block traffic flow.
Height matters too. Standard countertop height is 36 inches, and most kitchen carts match this, so they align flush with your existing counters for seamless meal prep. Jot down these measurements on paper before shopping, it prevents expensive returns.
Consider your actual usable floor space. Roll the cart to where you plan to position it most often. Ideally, you’ll have at least 12 inches of clearance on each side for comfortable access and movement. If you’re in a really tight spot, a slim 12-inch-deep cart might work better than a 24-inch model, even if you sacrifice a little storage.
Style Considerations for Different Kitchen Aesthetics
Your kitchen’s look influences which cart feels right. In a modern kitchen with stainless steel appliances, a sleek metal-frame cart with clean lines works better than a rustic farmhouse design. Conversely, a kitchen with warm wood tones and open shelving calls for a natural wood or butcher block top.
If you’re uncertain, neutral options like white or natural wood pair with almost any aesthetic. Butcher block tops are timeless and age beautifully: they do require regular oiling (food-grade mineral oil, once a month or as needed) to prevent drying and cracking, so factor that into your maintenance plan.
Color and finish matter for cohesion. A matte black frame blends into modern spaces, while weathered wood suits farmhouse or cottage kitchens. Match your cart to your cabinet or countertop color family, don’t make it the only stainless or black element in an all-white kitchen unless that’s a bold, intentional statement.
Top Features and Materials to Look For
Stability is non-negotiable. The cart must not wobble when you rest weight on it, especially if you’re using it for detailed knife work or kneading dough. Look for a solid welded frame, not bolted or screwed joints, and test it in the showroom by pushing on the countertop with real pressure.
Casters (wheels) should lock. When the cart is in place, all four wheels must have locking mechanisms, not just friction locks, but true brakes that engage fully. Unlocked wheels under a loaded cart are an accident waiting to happen. Check that each caster turns smoothly yet holds its position when locked.
Material durability varies by budget and use. Stainless steel frames and tops resist water and don’t stain, but they show fingerprints and cost more. Butcher block or hardwood tops feel warmer and are easier on knives, but need regular sealing and oiling to prevent water damage. Laminate surfaces are budget-friendly and waterproof, but less resistant to heat and sharp impacts.
Drawer and shelf construction matters. Full-extension drawers let you access everything without stretching. Reinforced shelves, especially if you plan to store heavy appliances or large pots, should have weight ratings listed. Open shelving is convenient, but closed storage (cabinets or drawers) keeps dust and splashes off frequently used items.
Consider woodworking project plans if you’re building a cart from scratch: they provide detailed joinery and materials lists to ensure your structure is sound and safe to use daily.
Installation and Placement Tips
Installing a kitchen cart island is simple, it comes assembled or requires minimal assembly (usually just attaching legs and casters). Before setting it in place, wipe down all surfaces with a damp cloth to remove manufacturing dust and residue.
Floor type matters. On hardwood or tile, use felt pads under the caster wheels to prevent scratches when rolling. If you have polished concrete or another delicate surface, furniture sliders rated for that surface work better. These pads and sliders are cheap insurance against floor damage.
Placement should follow a traffic pattern. Avoid blocking the primary walkway between your refrigerator, stove, and sink, the classic kitchen work triangle. Instead, position the cart off to one side or in a corner where it enhances workflow without creating a bottleneck. If you use it primarily for prep work, place it near your cutting boards and knives but away from the cooktop steam and heat.
Electricity access is useful if your cart has hooks for a kettle or small appliance. Check that nearby outlets are accessible and that any cord runs safely along the cart’s frame or wall, not across foot traffic.
Water and heat are the cart’s enemies. Keep it away from the dishwasher discharge area and at least 2 feet from the stove or oven vent. Humidity and direct heat warp wood and degrade laminate finishes. In a warm, humid climate, ensure your kitchen has good ventilation to prevent swelling or mold growth on wood components.
Maximizing Your Kitchen Cart Island for Storage and Functionality
Organization is the difference between a useful cart and an overstuffed mess. Assign zones: top shelf for mixing bowls and frequently used small appliances, middle shelf for spices and jars, bottom shelf for heavier items like cast iron or stock pots. Keep heavy items low to lower the center of gravity and reduce tipping risk.
Use drawer dividers and stackable bins to prevent sliding and maximize vertical space. Label containers so everyone in your household knows where things belong, no hunting for the pasta spoon at dinner time.
Don’t overload shelves. Just because a shelf can technically hold 50 pounds doesn’t mean you should fill it. A crowded cart looks chaotic, restricts access, and makes the unit harder to move smoothly. Aim for 60-70% capacity to maintain balance and ease of use.
Rotate items seasonally. Holiday baking equipment doesn’t need front-and-center real estate year-round. Swap it for everyday items in other seasons. This keeps your cart relevant and prevents it from becoming a junk collector.
For small kitchens, kitchen design ideas highlight how carts work best when integrated into a larger organization strategy. Pair your cart with wall-mounted magnetic strips for knives, hanging racks for utensils, and over-the-door organizers to maximize every inch of your space.
Maintenance keeps your investment in good shape. Wipe down the top after each use, oil butcher block monthly, and check casters quarterly to ensure they roll freely and lock securely. A well-maintained cart lasts 10+ years and becomes an indispensable part of your kitchen routine.