Table of Contents
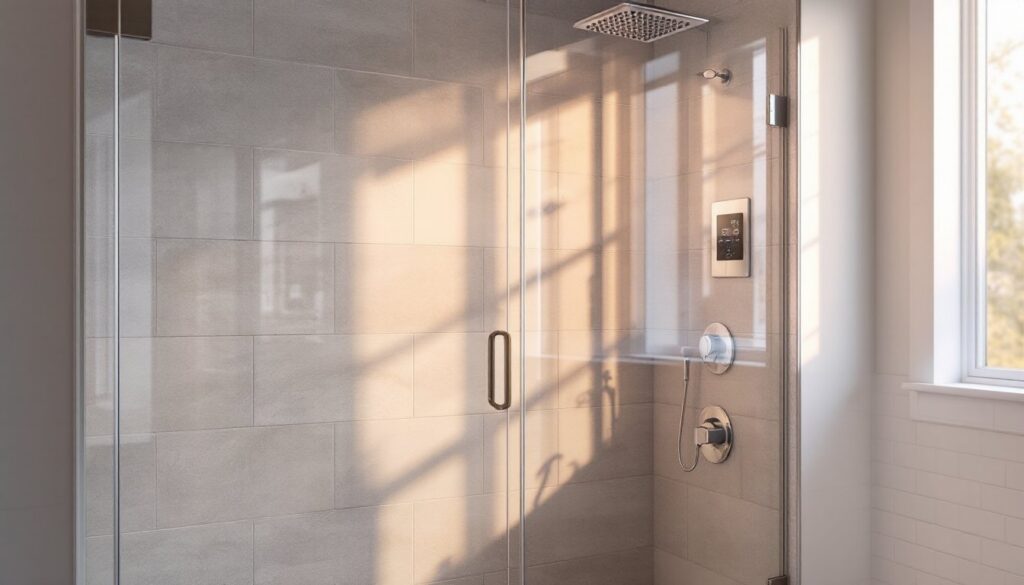
ToggleA Jacuzzi shower remodel isn’t just about adding jets to your existing enclosure, it’s a complete bathroom transformation that brings spa-level luxury into your daily routine. Whether you’re replacing an outdated system or upgrading from a basic shower, a Jacuzzi shower combines therapeutic water pressure with customizable features that make every morning feel like a retreat. For homeowners ready to invest in their comfort and property value, this guide walks through planning, selecting features, and installing a system that lasts.
Key Takeaways
- A Jacuzzi shower remodel combines luxury with functionality, delivering health benefits like reduced muscle tension and improved sleep while increasing home resale value by 50–70%.
- Plan your Jacuzzi shower remodel by assessing your existing bathroom’s dimensions, water pressure (minimum 40 PSI), plumbing, and electrical capacity to avoid costly surprises during installation.
- Budget realistically between $6,000 and $15,000 for a complete Jacuzzi shower remodel, including the system, labor, plumbing upgrades, electrical work, and finishing materials.
- Choose system features based on your needs: select from pulsating or steady jets, thermostatic mixing valves for temperature safety, and digital controls for preset preferences.
- Hire licensed contractors for installation since most jurisdictions require professionals for plumbing and electrical work; proper waterproofing and inspection during construction prevent costly water damage.
- Maintain your Jacuzzi shower system with monthly nozzle rinsing, quarterly deep cleaning with vinegar, and annual professional servicing to ensure 15–20 years of reliable performance.
Why Upgrade to a Jacuzzi Shower System
Modern Jacuzzi shower systems offer far more than the tub-mounted versions from decades past. Today’s shower heads combine steady rainfall patterns with adjustable body jets, thermostatic mixing valves for safety, and digital controls that remember your preferences. Upgrading delivers genuine health benefits, massage jets ease muscle tension, improved water pressure improves circulation, and the ritual itself reduces stress and improves sleep quality.
From a resale perspective, a luxury shower system ranks high on buyers’ wish lists. Homeowners report that updated bathrooms return 50–70% of renovation costs at resale, and a Jacuzzi shower is a premium feature that justifies that investment. Beyond the numbers, daily quality-of-life improvements are immediate. You’re not just washing anymore: you’re starting and ending each day with purpose-built comfort.
Importantly, a Jacuzzi shower remodel also modernizes your plumbing and electrical systems. Older bathrooms often have undersized water lines, weak pressure, or outdated wiring that can’t handle modern systems. This remodel forces those upgrades, leaving your entire bathroom better equipped for the future.
Planning Your Jacuzzi Shower Remodel Project
Start with honest assessment of your existing bathroom. Measure the shower enclosure, most Jacuzzi systems fit standard 3′ × 3′ stalls, but larger configurations require custom systems. Check your water pressure (a simple gauge from any hardware store costs under $10). Jacuzzi showers need minimum 40 PSI: anything less means you’ll need a pressure boost pump, which adds cost.
Next, inspect plumbing and electrical. Jacuzzi systems demand a dedicated hot water line and a separate cold line: mixing old and new pipes often causes temperature inconsistencies. Electrical needs are equally critical, modern systems require a 20-amp circuit, GFCI protection (as per National Electrical Code), and waterproof junction boxes. If your bathroom doesn’t have modern wiring, budgeting for an electrician is non-negotiable.
Do you need permits? Most jurisdictions require permits for plumbing and electrical work, especially involving structural changes or new circuits. Call your local building department before you start, permit costs typically run $100–$300, but unpermitted work can block a future sale or create insurance liability.
Budget Considerations and Cost Factors
Jacuzzi shower systems range widely in price. Basic models with a rainfall head and 2–4 side jets run $1,500–$3,000 installed. Mid-range systems (6–8 jets, digital controls, thermostatic valve) cost $3,500–$6,000. Premium systems with body-zone targeting, steam, and custom enclosures exceed $8,000. Labor typically adds another 30–40% on top of the unit cost.
Hidden costs add up fast. Plumbing reroutes, if needed, run $800–$2,000. Electrical upgrades (new circuit, GFCI outlet, waterproofing) add $500–$1,500. Tile, waterproofing membrane, and finishing materials can easily reach $1,000–$2,500. A realistic total budget for a full remodel, system plus tile, plumbing, electrical, and labor, typically falls between $6,000 and $15,000.
Save money by keeping the existing shower footprint if it’s structurally sound. Avoid custom enclosures unless necessary. Buy the system first, then design the tile and fixtures around it, rather than the reverse. And get three quotes from licensed contractors, price variation is usually 20–30%, and the lowest bid isn’t always the safest choice.
Choosing the Right Jacuzzi Shower Features
Jacuzzi shower systems come modular. Start with the core: a rainfall shower head (usually 8–12 inches in diameter, delivering 2–2.5 gallons per minute), plus body jets positioned at shoulder, mid-back, and lower-back heights. Most homeowners prefer 4–6 jets for balance between coverage and water usage.
Then decide on controls. A simple diverter valve lets you switch between the overhead head and jets, basic but functional. A thermostatic mixing valve maintains your exact water temperature even if someone else in the house turns on a faucet (a safety must if you have kids or elderly family). Digital controls let you save preset temperature and jet pressure preferences, and some integrate with smart home systems.
Consider water efficiency too. Modern low-flow shower heads use 2.0–2.5 GPM, down from older 5 GPM standards. EPA WaterSense-certified systems cut water use by 20% without sacrificing pressure. Over a year, that saves both water and heating costs, meaningful savings in higher-cost utility regions.
Popular Jet and Water Pressure Options
Body jets come in three types. Pulsating jets mimic a massage, ideal for sore muscles. Steady jets deliver constant pressure for general circulation and relaxation. Adjustable jets let you dial the intensity up or down. Most buyers opt for a mix, pulsating lower jets with steady upper jets.
Water pressure is key. The best systems allow independent control of the overhead head and jet zones. So you might run the rain head at full pressure while setting lower-back jets to a gentle pulse. A pressure-balancing valve ensures that if pressure drops elsewhere in the home, your shower adjusts automatically, preventing sudden temperature or flow surges.
Personal preference drives the final choice. If you have joint pain, invest in pulsating jets. If you want a simple, durable system you can install without upgrades, a basic fixed-jet setup fits the bill. Some installations include a steam module (which requires significant additional plumbing and a dedicated generator), but that’s a premium add-on and not necessary for core comfort.
For reference, leading home improvement guides like those from Bob Vila detail specific jet configurations and their effects, helping narrow the decision.
Installation and Preparation Tips
Installation is not a typical DIY project unless you’re already a licensed plumber and electrician. Most municipalities require licensed professionals for water lines and circuits, both for code compliance and insurance coverage. That said, understanding the steps helps you communicate with contractors and catch quality issues.
First comes preparation. Your contractor will demolish the existing shower surround (if applicable), expose the wall studs, and check for water damage or mold, common lurkers in older bathrooms. The walls are thoroughly cleaned, and a waterproofing membrane (cement board and liquid sealant, or modern foam-core systems) is installed behind all wet areas. This step is critical: skip it and your remodel fails in 3–5 years.
Next, the rough plumbing is installed. New supply lines (hot and cold) and a drain line are run to the shower valve location. The mixing valve is mounted in the wall, and the jet lines are routed to each nozzle location. All connections are pressure-tested before walls are closed.
Electrical comes simultaneously: new 20-amp circuit, GFCI outlet, and waterproof junction box for any digital controls or lighting. All work must pass inspection before walls are closed.
Finishing work includes tiling (grout and sealant are essential for waterproofing), trim installation, and final system testing. Temperature calibration and jet pressure balancing happen at the very end. A good contractor tests for leaks over 24–48 hours before you use the system.
Common pitfalls: misaligned jet nozzles (measure twice before drilling), undersized supply lines (causes low pressure), and skipped waterproofing (water intrusion into walls is catastrophic). This Old House provides detailed renovation checklists that can keep you on track through each phase.
Safety reminders: wear safety glasses during demolition, a dust mask when cutting tile or cement board, and ensure the work area is dry to prevent slip hazards. If your contractor doesn’t enforce these basics, find another one.
Maintenance and Care for Long-Term Performance
A Jacuzzi shower system properly installed and maintained lasts 15–20 years. The key is prevention and routine care.
Monthly tasks are minimal: rinse jet nozzles with clean water and check for mineral buildup. If your area has hard water, consider a whole-house softener or a dedicated shower filter. Mineral deposits clog jets far faster than anything else.
Quarterly, deep-clean the nozzles using a soft brush and mild white vinegar (never abrasive cleaners on jet covers). Soak nozzles overnight if deposits are stubborn, then flush with hot water. Grout and caulk around the surround should be inspected for cracking or mold: re-caulk annually with 100% silicone caulk to prevent water intrusion.
Annually, have a professional service the mixing valve and test water pressure and temperature calibration. This costs $200–$400 but catches issues early. If water pressure drops suddenly, it often means mineral buildup in the supply lines, a technician can flush the system or replace supply screens.
Waterproofing is a long-term play. Your membrane and grout sealer should be reapplied every 3–5 years. If you notice soft spots in the wall or smell musty odors, stop and call a contractor, hidden water damage is expensive to repair.
For planning and budgeting such a remodel, resources like ImproveNet help homeowners understand timelines, typical costs in their region, and contractor vetting strategies, making the entire process less daunting.